Day 1:
Our first day of editing and producing the digipak was really simple as all we did was select the photos we want to use for the CD casing aka the front, side and back outside as well as the front, side and back inside. As well as choosing a picture to use for the magazine poster.Day 2:
On day two of filming we found and copied all the logos we needed to use for the back cover and poster. The logos were all for music streaming sites such as YouTube and Spotify. We then tried to figure out how to fit the images to the sizes of the correct dimensions, something which we couldn't figure out. Therefore we googled it but still came up with nothing. It was very frustrating because we had hit an obstacle before we even had really begun. We then asked our teacher and ICT technician to come and help us and get them to walk us through the process so that we would know what to do for the next images.We created a folder to show editing photos which we were going to take throughout the process and eventually fit every picture to the dimensional template. We did this by inserting the template into photoshop and manually fit the pictures to scale.


Day 3:
Today we edited the back outside cover of the album as well as completing the front. We wanted to keep the front cover as simple as possible and not clutter the cover. The Chainsmokers keep their covers clean and neat so we wanted to do the same thing. The back cover would be more complex as we had to insert logos, a copyright paragraph and the song's text. Everything was straightforward, the only issues we had was deciding what sizes the logos were to be and where to put the text. Other than that we stuck to our original plan.Day 4:
On day 4 we tidied up the outside covers before moving onto the inside. We had decided we didn't want to change the picture where the CD was intended to go and had the idea to insert lyrics onto the front inside picture in order to change the picture and include some more elements which may be found on a conventional album.

Day 5:
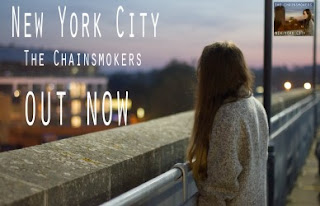
Day five was one of our final days editing and was focused completely on the poster as we were happy with the outcome of the album artwork itself. We got up the planning posts on our blog and tried to stick to it as much as possible. Then, we inserted the edited album cover and initially placed in in the top right corner, something we eventually changed. The text was inserted next. Grace had the idea of inserting a star rating but after not finding one we liked on google we changed our mind and didn't include it. The logos were then inserted for both music streaming sites and the record labels for The Chainsmokers to ensure they gained recognition, much like they would on any other album.

Day 6:
Our final day of editing allowed us to make the poster the correct dimensions and changed around a couple of things as a result of this, images of which can be found in second edit. Then I emailed all the editing pictures we took during the process so that we could put them into our blogs. After that was done we were happy to say we had completed our ancillary task and the digipak and promotional poster were done.
Reflection:
The editing process for our ancillary tasks was quite long and frustrating. We encountered a lot of problems as none of us were familiar with photoshop therefore we had to rely heavily on google and our teachers help in learning how everything worked. This also resulted in a lot of trial and error as we had to use different techniques in order to produce a product we were proud of and happy with. If I could've done anything differently it would've involved learning how photoshop worked before hand as it would've saved a lot of time and stress in the editing process.


No comments:
Post a Comment